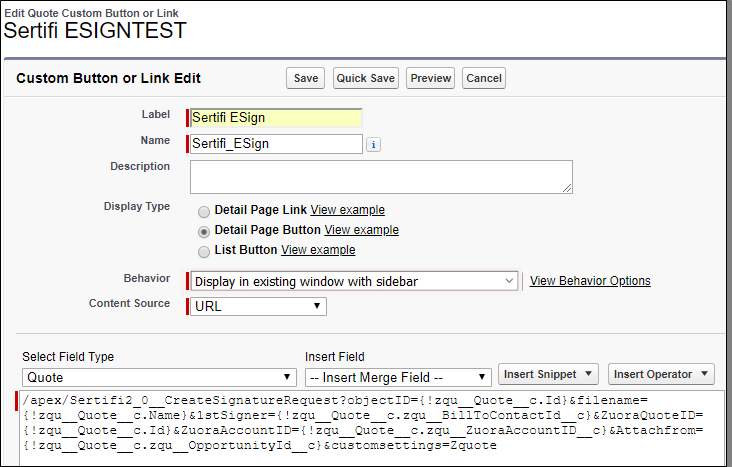
This is the sixth step in completing your Sertifi for Zuora installation.
To create a custom button:
- Navigate to Create > Objects.
- Click Zuora Quote.
- Navigate to Buttons, Links, and Actions in the Zuora quote object.
- Click New Button or Link.
- Enter the following fields:
- Label - enter Sertifi E-Sign
- Name - enter Sertifi E-Sign.
- Display Type - select Display in existing window with sidebar.
- Behavior - select Display in existing window with sidebar
- Text box - enter the following: /apex/Sertifi2_0__CreateSignatureRequest?objectID={!zqu__Quote__c.Id}&filename={!zqu__Quote__c.Name}&1stSigner={!zqu__Quote__c.zqu__BillToContactId__c}&ZuoraAccountId= {!zqu__Quote__c.zqu__ZuoraAccountId__c}}&ZuoraQuoteId={!zqu_Quote_c.Id}

- Select the functions you want to automate by using the parameters provided in the Parameter table, or by using the provided examples.
- Click Save.
- Add your button to your page layout. For more information, see Adding the Sertifi button.
Parameter table
| Parameter Code | Parameter Definition |
|---|---|
| &filename= | Sets the Sertifi file name |
| &1stsigner= | Sets the first level signer. You can use an email field or Contact ID to set the signer. |
| &2ndsigner= | Sets the second level signer. You can use an email field or Contact ID to set the signer. |
|
&3rdsigner= |
Sets the third level signer. You can use an email field or Contact ID to set the signer. |
| &4thsigner | Sets the fourth level signer. You can use an email field or Contact ID to set the signer. |
| &5thsigner= | Sets the fifth level signer. You can use an email field or Contact ID to set the signer. |
| &CCsigner= | Adds a carbon copy. You can use an email field or Contact ID to set the CC recipient. |
| &customsettings= | Sets which Sertifi application setting record to use. |
| &ResourceGroup= | Sets the email group. Contact Sertifi support to enable email groups. |
| &salesforcefolder= | Sets the Salesforce document folder. Use the document folder ID, not the folder name. |
| &fileexternalid1= to &fileexternalid10= | Sets External Ids 1 through 10. You can use these ids as a token to customize your email templates. Set the tokens as: {FileExternalID1} – {FileExternalID2} |
| &redirecturl= | Sets a URL the signer is redirected to after signing a document. |
| &attachmentID= | Attaches a signature document automatically. Document library file names must include .pdf or .doc. You can pass multiple IDs to attach multiple signature documents by separating the IDs with a comma. |
| &RefAttachmentID= | Attaches a reference document automatically. Document library file names must include .pdf or .doc. You can pass multiple IDs to attach multiple signature documents by separating the IDs with a comma. |
| &AttachFrom= | Sets which notes and attachments to display. Enter a comma separated list of record IDs for this parameter. |
| &AutoAdvance=True | Enables the one-click process. You must add at least one signer and either a payment or document for this parameter to work. |
| &ReturnTo=SContract | Takes sender to EContract record after sending instead of the parent object. |
| &ReturnTo=InPersonAuto | Takes sender to the in-person signing page after sending instead of the parent object. |
| &ExpireFolderOn= |
Prefills the expiration date (either by date or DateTime rounded to the closest hour) in the wizard sending process. You can't use this parameter with the one-click process. To format for DateTime you must follow the formula of yyyy-mm-dd hh:mm:ss. For example, &ExpireFolderOn={!YEAR( TODAY()}{!MONTH( TODAY() ) }{!DAY (TODAY() )}{!HOUR( TIMENOW()}:{!MINUTE( TIMENOW() )}:{!SECOND( TIMENOW() )} For date, you must follow the formula of &ExpireFolderOn= { !TODAY () + whole number} For example, if you want to auto expire a folder after 7 days, your formula would appear as &ExpireFolderOn={!TODAY()+7}. |
| &paymentname= | Sets the Sertifi payment name. |
| &paymentamount= | Sets the payment amount. |
| &paymentDueDate= | Sets the payment due date. |
| &ApplyOwnersSignature=true | Applies the sender's signature as soon as the request is sent. You must add the sender's email as a signer in the file, and select Show Apply Signature in the application settings. |
| &EnableIDCheck=true | Creates the ability to manually select for your signer if you want to enable the ID check. Select this box, and then when the signer accesses the document, they must complete the ID check. |
| &EnableIdCheckfor= | Gives you the ability to automatically assign a signer for the ID check. Using this parameter, the wizard shows your signer and ID check as preselected. |
| &EventDate= | Sets the event date. This must follow the formula of &EventDate= { !TODAY () + whole number} For example, if the event occurs in 7 days, your formula would appear as &EventDate={!TODAY()+7}. |
| &paymentoperation= | Sets the payment type for authorizations. To use for authorizations, enter &paymentoperation=authorize. This parameter also requires &paymentamount to be set to 0. |
| &ZuoraAccountId= | Sets the Zuora account ID in order to map a payment or authorization that's about to be completed to a Zuora account. Use zqu_Quote_c.zqu_ZuoraAccountId_c |
| &ZuoraQuoteId= Required | Sets the Zuora quote ID in order to map a payment or authorization token to a Zuora quote. Use zqu_Quote_c.Id |
Parameter examples
You can copy and paste the following parameter strings into your custom Sertifi button for Zuora. For each parameter, make sure you delete the word ADD, and replace it with a value from the Insert Merged Field dropdown.
- Click and Send automation - /apex/Sertifi2_0__CreateSignatureRequest?objectID={!zqu__Quote__c.Id}&filename={!zqu__Quote__c.Name}&1stSigner=ADD&ZuoraQuoteId={!zqu__Quote__c.Id}&ZuoraAccountId={!zqu__Quote__c.zqu__ZuoraAccountId__c}&AttachmentId=ADD&AutoAdvance=True&ReturnTo=SContract
- In-person signing - /apex/Sertifi2_0__CreateSignatureRequest?objectID={!zqu__Quote__c.Id}&filename={!zqu__Quote__c.Name}&1stSigner=ADD&ZuoraQuoteId={!zqu__Quote__c.Id}&ZuoraAccountId={!zqu__Quote__c.zqu__ZuoraAccountId__c}&AttachmentId=ADD&ReturnTo=InPersonAuto
There should be no spaces in your parameter strings.
